Showing posts with label linux. Show all posts

Solved : How to zip directories in Linux


In this post we will see how you can use zip command in Linux to compress directories and files and unzip them. zip is also very useful if you have to further uncompress the files on windows machine as by default windows allows you to open zip files without installing any extra program.

First let's install zip. Below we will show installation instruction for both Ubuntu and Redhat linux/CentOS.

Ubuntu :

Update the package repo:

root@CloudVedas:~# sudo apt-get update

Now let's install zip and unzip packages:

sudo apt-get install zip unzip -y


RHEL/CentOS:

Update the package repo:

root@CloudVedas:~# sudo yum makecache

Install the zip and unzip packages

root@CloudVedas:~# sudo yum install zip unzip


Once the zip and unzip packages are installed we can now see their usage.

The basic syntax of the zip command is below:

zip -r <output_file>.zip  <dir1> <dir2> ... <dirn>

Let's see some examples :

We will zip three directories

root@CloudVedas:~# zip -r finaldir.zip dir1 dir2 dir3

  adding: dir1/ (stored 0%)

  adding: dir1/test11 (stored 0%)

  adding: dir1/test13 (stored 0%)

  adding: dir1/tet12 (stored 0%)

  adding: dir2/ (stored 0%)

  adding: dir2/test21 (stored 0%)

  adding: dir2/test22 (stored 0%)

  adding: dir2/test23 (stored 0%)

  adding: dir3/ (stored 0%)

  adding: dir3/test31 (stored 0%)

  adding: dir3/test32 (stored 0%)

  adding: dir3/test33 (stored 0%)

root@CloudVedas:~#

When we list the contents we can see our zipped file finaldir.zip .

root@CloudVedas:~# ls -lrth

total 4.0K

drwxr-xr-x 1 root root 4.0K Aug 29 13:54 dir1

drwxr-xr-x 1 root root 4.0K Aug 29 13:54 dir2

drwxr-xr-x 1 root root 4.0K Aug 29 13:54 dir3

-rw-r--r-- 1 root root 1.8K Aug 29 13:55 finaldir.zip

root@CloudVedas:~#


You can also zip all the directories in the present working directory using this simple bash script.

for dir in $(ls -d */); do zip script_archive.zip $dir; done 


View contents of a zip file 

If you want to see the contents of a zip file without unzipping it you can use either vi or vim .

root@CloudVedas:~# vim finaldir.zip

or

root@CloudVedas:~# vi finaldir.zip

With the above commands you can easily see the list of files and directories inside the zip.


unzip

Now let's see how you can unzip a file. Be careful when you are unzipping a file with out any extra options as it will overwrite the existing contents if same name exist. Best is to unzip the file in a different directory and then copy the required files and directories as needed in the destination folder.

root@CloudVedas:~/unziptest# unzip finaldir.zip

Archive:  finaldir.zip

   creating: dir1/

 extracting: dir1/test11

 extracting: dir1/test13

 extracting: dir1/tet12

   creating: dir2/

 extracting: dir2/test21

 extracting: dir2/test22

 extracting: dir2/test23

   creating: dir3/

 extracting: dir3/test31

 extracting: dir3/test32

 extracting: dir3/test33

root@CloudVedas:~/unziptest# ls

dir1  dir2  dir3  finaldir.zip

root@CloudVedas:~/unziptest#

If you want to see other useful options on unzip you can use below command

unzip -hh

So above we have seen how you can use zip and unzip in Linux. zip is a good utility for smaller files and directories but if you need better compression you should use tar.gz. Check out our post on most useful tar command examples if you want to know more about tar.gz and tar.bz2 or other compression methods in Linux.

If you want to transfer this file out of the Linux server check our post on how to transfer files to and from linux .

Do let us know in comments section if you have any query or suggestion about this post.

Solved : Unable to locate package error in Ubuntu

Unable to locate package ubuntu

During installation of a package in ubuntu you may get an error 
Unable to locate package . 

In this post we will show you how you can fix that error and continue with your installation. 

Below is a sample error I got while installing vagrant.  But, the solution discussed below is common for any package installation in ubuntu.


root@cloudvedas:~# apt install vagrant
Reading package lists... Done
Building dependency tree
Reading state information... Done
E: Unable to locate package vagrant

To resolve this issue you have to update your apt repo. You can simply do this by running below command as root user or use sudo .


root@cloudvedas:~# apt update

or

user@cloudvedas:~# sudo apt update


Once the apt update is successfully completed you can try the installation once more.


root@cloudvedas:~# apt install vagrant

or

user@cloudvedas:~# sudo apt install vagrant


It should work now.

Do let us know in the comment section if you are still facing any issue after following the above steps.

Most useful Tar command examples


In this post we will see how to use the tar command to compress and uncompress your files and directories. Many softwares are distributed by compressing them using tar so the examples below will guide you how you can uncompress or open such files. This command is also very useful when you have to archive or share huge directories or files. 

Create a tar 

In the below example we have a directory called cloudvedas which has multiple files. Let's tar this directory. With -v option you can see what all files it is adding in the tar ball.

-c: Create an archive.
-v: Verbose output shows you all the files being archived.
-f: Allows you to specify the filename of the archive.

cvterm#tar -cvf cloudvedas.tar cloudvedas
cloudvedas/
cloudvedas/cv1.sh
cloudvedas/cv2.sh
cloudvedas/cv3
cloudvedas/cv4
cloudvedas/cv5.py
So now we can see we have our tar file.
cvterm#ls -lrth
total 12K
drwxr-xr-x 1 sagu sagu 4.0K Jun 16 08:19 cloudvedas
-rw-r--r-- 1 sagu sagu  10K Jun 16 08:20 cloudvedas.tar
cvterm#


List or View contents of a tar

Now if you want to check all the files which are in the tar ball without doing untar/opening/uncompressing you can check it as below

 cvterm#tar --list -f cloudvedas.tar
cloudvedas/
cloudvedas/cv1.sh
cloudvedas/cv2.sh
cloudvedas/cv3
cloudvedas/cv4
cloudvedas/cv5.py
cvterm#

 Another way to see the contents of a tar ball without untar is using -tvf option like below. This will show the permissions also.

cvterm#tar -tvf cloudvedas.tar
drwxr-xr-x sagu/sagu         0 2021-06-16 08:19 cloudvedas/
-rw-r--r-- sagu/sagu         0 2021-06-16 08:19 cloudvedas/cv1.sh
-rw-r--r-- sagu/sagu         0 2021-06-16 08:19 cloudvedas/cv2.sh
-rw-r--r-- sagu/sagu         0 2021-06-16 08:19 cloudvedas/cv3
-rw-r--r-- sagu/sagu         0 2021-06-16 08:19 cloudvedas/cv4
-rw-r--r-- sagu/sagu         0 2021-06-16 08:19 cloudvedas/cv5.py
cvterm#

Create tar.gz or .tgz which is tar and gzip in single command.

Now let's try to gzip the directory along with tar in a single command. We will do this with option -z .

-z: Compress the archive with gzip.

cvterm#tar -cvzf cloudvedas.tar.gz cloudvedas

We can see below a .tar.gz is created cloudvedas.tar.gz 


cvterm#ls -lrth
total 8.0K
drwxr-xr-x 1 sagu sagu 4.0K Jun 17 19:34 cloudvedas
-rw-r--r-- 1 sagu sagu 5.5K Jun 17 19:34 cloudvedas.tar.gz
cvterm#

We can also create .tgz which is same as .tar.gz 

cvterm#tar -cvzf cloudvedas.tgz cloudvedas

cvterm#ls -lrth
total 16K
drwxr-xr-x 1 sagu sagu 4.0K Jun 17 19:34 cloudvedas
-rw-r--r-- 1 sagu sagu 5.5K Jun 17 19:34 cloudvedas.tar.gz
-rw-r--r-- 1 sagu sagu 5.5K Jun 17 19:36 cloudvedas.tgz
cvterm#

Create a  tar.bz2 or tbz or tb2

The tar.bz2 or tbz or tb2 creates a file which is more compressed as compared to gz but these 3 extensions takes more time to compress and uncompress. If you see the file size listed below you can see clear difference.


cvterm#tar -cvjf cloudvedas.tar.tb2 cloudvedas

or

cvterm#tar -cvjf cloudvedas.tar.tbz cloudvedas

or

cvterm#tar -cvjf cloudvedas.tar.bz2 cloudvedas

cvterm#ls -lrth
total 5.1M
drwxr-xr-x 1 sagu sagu 4.0K Jun 17 19:34 cloudvedas
-rw-r--r-- 1 sagu sagu 5.5K Jun 17 19:34 cloudvedas.tar.gz
-rw-r--r-- 1 sagu sagu 5.5K Jun 17 19:36 cloudvedas.tgz
-rw-r--r-- 1 sagu sagu  332 Jun 17 19:37 cloudvedas.tar.tb2
-rw-r--r-- 1 sagu sagu  332 Jun 17 19:38 cloudvedas.tar.tbz
-rw-r--r-- 1 sagu sagu  332 Jun 17 19:38 cloudvedas.tar.bz2
-rw-r--r-- 1 sagu sagu 5.1M Jun 17 19:44 cloudvedas.tar
cvterm#


List / View the contents of .tar.gz .tgz .tar.bz2 .tar.tbz  .tar.tb2

You can simply view the contents of all these file types by same option of -tvf

cvterm#tar -tvf cloudvedas.tar.gz

or 

cvterm#tar -tvf cloudvedas.tgz

or

cvterm#tar -tvf cloudvedas.tar.tbz

or

cvterm#tar -tvf cloudvedas.tar.bz2

or

cvterm#tar -tvf cloudvedas.tar.tb2


Extract or Untar a file

To untar a file in the current directory do below

-f: It tells tar the name and path of the compressed file.
-x: Extract the files.
-v: Verbose output shows you all the files being extracted.

cvterm#tar -xvf cloudvedas.tar 

To untar a file in a different directory use option -C

cvterm#tar -xvf cloudvedas.tar -C /var/tmp/newdir 
cvterm#pwd
/var/tmp/newdir
cvterm#ls
cloudvedas
cvterm#

Now let's extract single file from tar

cvterm#tar -xvf cloudvedas.tar cloudvedas/file5.txt

Uncompress and untar .tar.gz or .tgz

cvterm#tar -xvf cloudvedas.tar.gz
or
cvterm#tar -xvf cloudvedas.tgz 

Uncompress and untar single file .tar.gz or .tgz


cvterm#tar -zxvf cloudvedas.tar.gz cloudvedas/file4.txt
cloudvedas/file4.txt
cvterm#tar -zxvf cloudvedas.tgz cloudvedas/file5.txt
cloudvedas/file5.txt

Uncompress and untar .tar.gz or .tgz in a different directory

cvterm#tar -xvf cloudvedas.tar.gz -C /home/sagu/newdir/
or
cvterm#tar -xvf cloudvedas.tgz -C /home/sagu/newdir/

Uncompress and untar tar.bz2, tar.tbz, tar.tb2 

cvterm#tar -xvf cloudvedas.tar.bz2
or
cvterm#tar -xvf cloudvedas.tar.tbz
or
cvterm#tar -xvf cloudvedas.tar.tb2

Extract multiple files from .tar

cvterm#tar -xvf cloudvedas.tar "cloudvedas/file.txt" "cloudvedas/file2.txt"
cloudvedas/file.txt
cloudvedas/file2.txt

Extract multiple files from tar.gz .tgz using -z option

-z: Decompress the archive using gzip

cvterm#tar -zxvf cloudvedas.tar.gz "cloudvedas/file3.txt" "cloudvedas/file4.txt"
or
cvterm#tar -zxvf cloudvedas.tgz "cloudvedas/file3.txt" "cloudvedas/file4.txt"

Extract multiple files from tar.bz2, tar.tbz, tar.tb2 using -j option

cvterm#tar -jxvf cloudvedas.tar.bz2 "cloudvedas/file5.txt" "cloudvedas/cv1.sh"
or
cvterm#tar -jxvf cloudvedas.tbz "cloudvedas/file5.txt" "cloudvedas/cv1.sh"
or
cvterm#tar -jxvf cloudvedas.tar.tb2 "cloudvedas/file5.txt" "cloudvedas/cv1.sh"

Extract group of files using --wildcard option

.tar

cvterm#tar -xvf cloudvedas.tar --wildcards '*.sh'

.tar.gz .tgz using -z option

cvterm#tar -zxvf cloudvedas.tar.gz --wildcards '*.sh'
cvterm#tar -zxvf cloudvedas.tgz --wildcards '*.sh'

tar.bz2, tar.tbz, tar.tb2 using -j option

cvterm#tar -jxvf cloudvedas.tar.bz2 --wildcards '*.txt'
cvterm#tar -jxvf cloudvedas.tar.tbz --wildcards '*.txt'
cvterm#tar -jxvf cloudvedas.tar.tb2 --wildcards '*.txt'

Add a new file or directory in .tar archive using -r option

cvterm#tar -rvf cloudvedas.tar cvnew1.sh   ##Adding a file
cvterm#tar -rvf cloudvedas.tar newdir1
  ## Adding dir

Check below that now we have new file and dir added in our .tar

cvterm#tar -tvf cloudvedas.tar
drwxr-xr-x sagu/sagu         0 2021-06-17 19:34 cloudvedas/
-rw-r--r-- sagu/sagu         0 2021-06-16 08:19 cloudvedas/cv1.sh
-rw-r--r-- sagu/sagu         0 2021-06-16 08:19 cloudvedas/cv2.sh
-rw-r--r-- sagu/sagu         0 2021-06-16 08:19 cloudvedas/cv3
-rw-r--r-- sagu/sagu         0 2021-06-16 08:19 cloudvedas/cv4
-rw-r--r-- sagu/sagu         0 2021-06-16 08:19 cloudvedas/cv5.py
drwxr-xr-x sagu/sagu         0 2021-06-17 19:17 cloudvedas/cvdir1/
drwxr-xr-x sagu/sagu         0 2021-06-17 19:17 cloudvedas/cvdir2/
-rw-r--r-- sagu/sagu   1048576 2021-06-17 19:33 cloudvedas/file.txt
-rw-r--r-- sagu/sagu   1048576 2021-06-17 19:34 cloudvedas/file2.txt
-rw-r--r-- sagu/sagu   1048576 2021-06-17 19:34 cloudvedas/file3.txt
-rw-r--r-- sagu/sagu   1048576 2021-06-17 19:34 cloudvedas/file4.txt
-rw-r--r-- sagu/sagu   1048576 2021-06-17 19:34 cloudvedas/file5.txt
-rw-r--r-- sagu/sagu         0 2021-06-18 19:27 cvnew1.sh
drwxr-xr-x sagu/sagu         0 2021-06-18 19:26 newdir1/

cvterm#

Note: You cannot add files or dir  to tar.gz, .tgz, tar.bz2, tar.tbz, tar.tb2 archives

Exclude specific file or directories while creating a tar

cvterm#tar -cf cloudvedasexclude.tar --exclude='cloudvedas/cvdir1' --exclude='cloudvedas/file2.txt' cloudvedas

As we can see below the file and directory we excluded are not in the tar.

cvterm#tar -tvf cloudvedasexclude.tar
drwxr-xr-x sagu/sagu         0 2021-06-18 19:25 cloudvedas/
-rw-r--r-- sagu/sagu         0 2021-06-16 08:19 cloudvedas/cv1.sh
-rw-r--r-- sagu/sagu         0 2021-06-16 08:19 cloudvedas/cv2.sh
drwxr-xr-x sagu/sagu         0 2021-06-17 19:17 cloudvedas/cvdir2/
-rw-r--r-- sagu/sagu   1048576 2021-06-17 19:33 cloudvedas/file.txt
-rw-r--r-- sagu/sagu   1048576 2021-06-17 19:34 cloudvedas/file3.txt
-rw-r--r-- sagu/sagu   1048576 2021-06-17 19:34 cloudvedas/file4.txt
-rw-r--r-- sagu/sagu   1048576 2021-06-17 19:34 cloudvedas/file5.txt
cvterm#


Above we have seen some examples of frequently used tar command options. You can also use tar command to convert your vmware ova files to ovf . Check this post on how to convert ova to ovf  using tar.

There are lot more options in tar that you can see using tar --help in your terminalDo let us know in the comment section if you want us to add any other examples.

Steps to create docker containers in your laptop


In this post we will see how to create a docker container of ubuntu on your windows laptop.

Pre-requisites:-

I am using “Docker for Windows” software to run dockers on my Windows 10 laptop. You can get “Docker for Windows” by clicking on this link .
If you have Windows 7 download Docker Toolbox for Windows with Virtualbox.

Ubuntu docker creation
Once you are done with docker installation let’s move ahead.
  • In the windows command prompt or in “Docker Quickstart Terminal” execute below command. By default it will pull the latest image of ubuntu container available in repository.
C:\CloudVedas>docker run ubuntu
  • If you need  specific version of Ubuntu you can mention the version name in command. Like below we are pulling Ubuntu 14.04 version. You can check all the available versions here .
C:\CloudVedas> docker run ubuntu:14.04
Unable to find image 'ubuntu:14.04' locally
14.04: Pulling from library/ubuntu
2e6e20c8e2e6: Pulling fs layer
30bb187ac3fc: Pulling fs layer


  • Now let’s see the image we have downloaded .
C:\CloudVedas> docker image ls
REPOSITORY      TAG                 IMAGE ID            CREATED             SIZE
ubuntu                   14.04               6e4f1fe62ff1        4 months ago        197MB


  • Let’s create a container with that image using the image id. Here we are using -t and -d option so that the container keeps on running in detached mode and we can login to it.
C:\CloudVedas>docker run -t -d 6e4f1fe62ff1
a8dee68d78026adb830edb04391af00ec8b7e1033e711fc640a1489ca54adc0a


  • List the running containers using “docker container ls”
C:\CloudVedas>docker container ls
CONTAINER ID       IMAGE        COMMAND      CREATED         STATUS     PORTS       NAMES
a8dee68d7802        6e4f1fe62ff1   "/bin/bash"      About a minute ago   Up About a minute eager_johnson


We can see our container is created 5 minutes ago and is up. You can also identify the container using the container id. Note that the container ID is same as the first 12 digits of the string we got when we executed docker run in last step.
  • Let’s get inside our container and check it.
C:\CloudVedas>docker exec -it  a8dee68d7802 /bin/bash


Once you are inside the Ubuntu container you can explore it. Let’s check the OS version.
root@a8dee68d7802:/# more /etc/os-release NAME="Ubuntu" VERSION="14.04.6 LTS, Trusty Tahr" ID=ubuntu ID_LIKE=debian PRETTY_NAME="Ubuntu 14.04.6 LTS" VERSION_ID="14.04" HOME_URL="http://www.ubuntu.com/" SUPPORT_URL="http://help.ubuntu.com/" BUG_REPORT_URL="http://bugs.launchpad.net/ubuntu/" root@a8dee68d7802:/#
  • If you don’t see your container up, it may have stopped automatically. To check all the containers which are/were running, execute command
C:\CloudVedas>docker ps -a

You can also create your own customized container image which you can use to deploy more containers in your environment. Refer this post on how to create a container image.  If instead of Docker hub you are using AWS ECR, check the post on how to push/pull image to/from AWS ECR

If you want to try next level on docker you can user dockerfile or docker-compose files to install your application. Like in our other post we cover how you can install wordpress in docker.

Hope this post helped you. Do let us know if you have any query or you get stuck in any installation step. 

Solved: How to use nmtui and nmcli tool to configure network in RedhatLinux

In this post we will see how to use nmtui for network management. This can be a very useful tool for starters in Redhat Linux 7.
  • Login to your server using putty and execute command “nmtui” to invoke the interface. If your machine is not in network you can login via console and follow the same steps mentioned below.
  • If you don’t have the nmtui tool installed, you can install it using yum (Note: If you don’t want to install a new package in your server you can use nmcli for network configuration. Refer the post for how to configure network with nmcli )
[root@cloudvedas ~]# yum install NetworkManager-tui
[root@cloudvedas ~]# nmtui
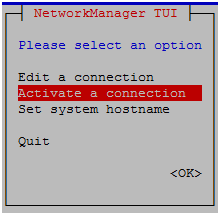
  • Once you get the interface you can navigate using Arrow keys , Tab key and make selection using “enter” key. So, using arrow key select “Edit a connection” and press enter.


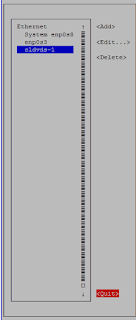
  • We have two network interfaces enp0s8 and enp0s3 . Today we will be configuring enp0s3. As enps0s8 is already configured and in use. So once highlighted enp0s3 go to “Add” and press enter.


  • Select the type of connection. For this tutorial we are selecting “Ethernet”.


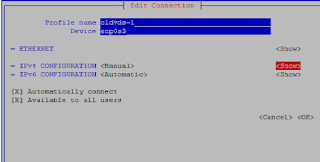
  • Once in “Edit connection” section enter “Profile name” , “Device”.  If you want static IP select “Manual” for IPv4 and select “Show”.


  • Once you select  “Show” enter your IP detail with subnet id. Here subnet id is /24 or 255.255.255.0 . Also enter gateway. If you want to use DNS enter DNS server details else leave it blank and select OK.


  • Once the IP configuration is done select “OK” again. Now you can see the new connection that you have created. Select “Quit” to come out.


  • Now let’s activate the connection. Execute “nmtui” in putty or console again and select “Activate a connection”  and press Enter.


  • Navigate with arrow key select the interface and then move right and Press enter on “Activate”. This will activate your interface as in image below.

  • Check if the new IP is configured.


  • Also let’s check in “nmcli” about the new connection.


If you want to change hostname refer this post on how to change hostname with nmtui or nmcli .
Hope this post is helpful. Do let me know if you have any query.

Solved: Create virtual environment with python 3 in linux

Once you have installed python 3.6 as described in the last post you can create virtual environment to work with it.
  • First let’s install the package of virtual environment for python 3.
CentOS/RHEL
sudo yum install -y python3-venv
Ubuntu
sudo apt-get install -y python3-venv 
  • Create a directory for you virtual environment and get inside it.
mkdir virtualenvscd virtualenvs
  • Now let’s create our virtual environment.
python3.6 -m venv cloudvedasenv
  • Finally activate the new virtual environment. Notice the new environment name in brackets once you run the source command. That means you are now inside the virtual environment.
[ec2-user@cloudvedas ~]$ source cloudvedasenv/bin/activate
(cloudvedasenv) [ec2-user@cloudvedas ~]$
  • If you want to install a package inside the virtual environment you can use pip .
(cloudvedasenv) [ec2-user@cloudvedas ~]$ pip install zappa requests flask

Solved: Install Python 3 in Linux and set it as default

In this post we will show you how to install python 3 in a Linux box. We have Centos 7 installed in our server.
Check installed python version
Most of the Linux versions by default have python installed. So let's check the current version.
[ec2-user@cloudvedas ~]$ python --version
 Python 2.7.5
[ec2-user@cloudvedas ~]$
As we can see from the above output, currently we have Python 2 installed and we need Python 3 so let's install it.
Install pre-requisites
Before we install python 3 let's first update the yum.
[ec2-user@cloudvedas ~]$ sudo yum -y update
Also, install yum utils.
[ec2-user@cloudvedas ~]$ sudo yum -y install yum-utils
And at the end install the CentOS development tools which will help you build and compile software from source code.
[ec2-user@cloudvedas ~]$ sudo yum -y groupinstall development
Install python 3.6.4
The standard yum repos does not have the latest python release, so we will install IUM (Inline with Upstream Stable) which will have the latest packages.
[ec2-user@cloudvedas ~]$ sudo yum -y install https://centos7.iuscommunity.org/ius-release.rpm
Now let's install Python 3.6.
[ec2-user@cloudvedas ~]$ sudo yum -y install python36u
Next we will install pip, which will manage software packages for Python:
[ec2-user@cloudvedas ~]$ sudo yum -y install python36u-pip
Finally, we will install the development packages.
[ec2-user@cloudvedas ~]$ sudo yum -y install python36u-devel
Let' check our  python version
[ec2-user@cloudvedas ~]$ python3.6 -V
Python 3.6.4
[ec2-user@cloudvedas ~]$
Update default python
But if you still run the normal command to check python version it will show the Python 2 version if it was installed by default.
[ec2-user@cloudvedas ~]$ python --version
 Python 2.7.5
 [ec2-user@cloudvedas ~]$
To reflect the new python version by default you create an alias in .bashrc file as described below in the last line of the file.
[ec2-user@cloudvedas ~]$ sudo vi ~/.bashrc

# .bashrc
# Source global definitions
if [ -f /etc/bashrc ]; then . /etc/bashrc fi
# Uncomment the following line if you don't like systemctl's auto-paging feature:
# export SYSTEMD_PAGER=
# User specific aliases and functions
alias python=python3.6
After making the changes save the file. Now, logout and login again, it should show you the new version.
[ec2-user@cloudvedas ~]$ python -V
Python 3.6.4
[ec2-user@cloudvedas ~]$
Check all installed python versions
Do remember that the default python 2 will still remain in the system as lot of system binaries have dependency on it.
To check all the python versions in your box you can check the installed packages as below.
[ec2-user@cloudvedas ~]$ yum list installed | grep -i python
If you want to create virtual environments in python read our next post.

Solved: How to extend or grow a linux filesystem under LVM

In this post we will see how to grow a Linux filesystem without reboot.
  • Let's check our current filesystem. We want to extend this filesystem by 200MB.
[root@cloudvedas CVFS1]# df -h /CVFS1
Filesystem                  Size Used Avail Use% Mounted on
/dev/mapper/cvsvg-cldvdsvol1 47M 12M    32M  26%   /CVFS1
[root@cloudvedas CVFS1]#
  • First check if we have free space in VG
[root@cloudvedas /]# vgs
 VG    #PV    #LV    #SN    Attr    VSize    VFree
 cvsvg  1      1      0      wz--n- 196.00m  144.00m
 rhel   1      3      0      wz--n- 7.51g    36.00m
[root@cloudvedas /]#
  • Since we don't have 200MB free in "cvsvg" so we will add a new disk to it. First label the disk for LVM and get it under LVM control using pvcreate.
[root@cloudvedas CVFS1]# pvcreate /dev/sdb2
 Physical volume "/dev/sdb2" successfully created
[root@cloudvedas CVFS1]#
  • Add the new partition to our VG.
[root@cloudvedas CVFS1]# vgextend cvsvg /dev/sdb2
 Volume group "cvsvg" successfully extended
[root@cloudvedas CVFS1]#
  • Check the VG size again.
[root@cloudvedas CVFS1]# vgs
 VG    #PV   #LV    #SN    Attr    VSize    VFree
 cvsvg  2     1      0     wz--n-  444.00m  392.00m
 rhel   1     3      0     wz--n-  7.51g    36.00m
[root@cloudvedas CVFS1]#
  • Now we have the required space so, let's extend the volume first.
[root@cloudvedas CVFS1]# lvextend -L +200M /dev/cvsvg/cldvdsvol1
 Size of logical volume cvsvg/cldvdsvol1 changed from 52.00 MiB (13 extents) to 252.00 MiB (63 extents).
 Logical volume cldvdsvol1 successfully resized
  • On checking the LV we can see it's now extended as is now of 252MB.
[root@cloudvedas CVFS1]# lvs
 LV VG Attr LSize Pool Origin Data% Meta% Move Log Cpy%Sync Convert
 cldvdsvol1 cvsvg -wi-ao---- 252.00m
 root rhel -wi-ao---- 6.67g
 swap rhel -wi-ao---- 820.00m
 testvol1 rhel -wi-a----- 4.00m
[root@cloudvedas CVFS1]#
  • Let's increase the filesystem now using resize2fs.
[root@cloudvedas CVFS1]# resize2fs /dev/cvsvg/cldvdsvol1
resize2fs 1.42.9 (28-Dec-2013)
Filesystem at /dev/cvsvg/cldvdsvol1 is mounted on /CVFS1; on-line resizing required
old_desc_blocks = 1, new_desc_blocks = 2
The filesystem on /dev/cvsvg/cldvdsvol1 is now 258048 blocks long.
  • Check the file system now.
[root@cloudvedas CVFS1]# df -h /CVFS1
Filesystem                   Size Used Avail Use% Mounted on
/dev/mapper/cvsvg-cldvdsvol1 241M  13M  217M  6%   /CVFS1
[root@cloudvedas CVFS1]#
Great so we have now extended the filesystem.

Solved: How to label a disk in Linux

In this post we will see how to label a new disk in Linux and create a new LVM partition.
Step 1 Scan the new LUNS.
Step 2 List the available disks and identify the one you want to use.
  fdisk -l |grep /dev/ |grep -v dm
Step 3 Use fdisk to label the disk. Here we are using disk sdb .
[root@cloudvedas scsi_host]# fdisk /dev/sdb
 Welcome to fdisk (util-linux 2.23.2).

Changes will remain in memory only, until you decide to write them.
 Be careful before using the write command.

Device does not contain a recognized partition table
 Building a new DOS disklabel with disk identifier 0x909f2c7b.

Command (m for help): p

Disk /dev/sdb: 1073 MB, 1073741824 bytes, 2097152 sectors
 Units = sectors of 1 * 512 = 512 bytes
 Sector size (logical/physical): 512 bytes / 512 bytes
 I/O size (minimum/optimal): 512 bytes / 512 bytes
 Disk label type: dos
 Disk identifier: 0x909f2c7b

Device Boot Start End Blocks Id System

Command (m for help):
Step 4 Create Primary partition using option "n" of size 200MB.
Command (m for help): n
 Partition type:
 p primary (0 primary, 0 extended, 4 free)
 e extended
 Select (default p): p
 Partition number (1-4, default 1):
 First sector (2048-2097151, default 2048):
 Using default value 2048
 Last sector, +sectors or +size{K,M,G} (2048-2097151, default 2097151): +200M
 Partition 1 of type Linux and of size 200 MiB is set
(Don't miss the + used before 200M. It's very critical else it won't work as expected)
Step 4 Now let's check our new partition
Command (m for help): p

Disk /dev/sdb: 1073 MB, 1073741824 bytes, 2097152 sectors
 Units = sectors of 1 * 512 = 512 bytes
 Sector size (logical/physical): 512 bytes / 512 bytes
 I/O size (minimum/optimal): 512 bytes / 512 bytes
 Disk label type: dos
 Disk identifier: 0xc1c8c781

Device Boot Start End Blocks Id System
 /dev/sdb1 2048 411647 204800 83 Linux

Command (m for help):
Step 5 In the above output we can see that the new partition is a standard linux partition.  Let's Change the partition type to Linux LVM. Here we will use "8e" which is a Hex code for LVM. You can type L to list all codes.
Command (m for help): t
 Selected partition 1
 Hex code (type L to list all codes): 8e

-Changed type of partition 'Linux' to 'Linux LVM'

Command (m for help): p

Disk /dev/sdb: 1073 MB, 1073741824 bytes, 2097152 sectors
 Units = sectors of 1 * 512 = 512 bytes
 Sector size (logical/physical): 512 bytes / 512 bytes
 I/O size (minimum/optimal): 512 bytes / 512 bytes
 Disk label type: dos
 Disk identifier: 0xc1c8c781

Device Boot Start End Blocks Id System
 /dev/sdb1 2048 411647 204800 8e Linux LVM

Command (m for help):
Step 6 Finally save the changes with option "w"
Command (m for help): w
The partition table has been altered!

Calling ioctl() to re-read partition table.
Syncing disks.
Step 7 Let's list the partition table to cross check that our partition table is saved correctly.
[root@cloudvedas /]# fdisk -l /dev/sdb

Disk /dev/sdb: 1073 MB, 1073741824 bytes, 2097152 sectors
 Units = sectors of 1 * 512 = 512 bytes
 Sector size (logical/physical): 512 bytes / 512 bytes
 I/O size (minimum/optimal): 512 bytes / 512 bytes
 Disk label type: dos
 Disk identifier: 0x0aa5ab95

Device Boot Start End Blocks Id System
 /dev/sdb1 2048 411647 204800 8e Linux LVM
 [root@cloudvedas /]#
Cool! So, we have now a LVM partition which we can bring under LVM control using pvcreate.

LVM Crash course

In this post we will give you a crash course on Linux LVM (Logical Volume Manager). This post will cover the most used LVM commands in a Linux Admin life.
Before we start first let's go through the concepts.
Physical Volumes (PVs): Storage devices (physical hard disks, partitions, RAID arrays etc.) provides raw storage
Volume Groups (VGs): Combine multiple PVs to create a group. They can be mirror or concatenation of PVs.
Logical Volumes (LVs): Create smaller volumes from the Volume Group(VG) as per your size requirement. You can can use the LVs to create filesystem on them.
Below commands are for RHEL 7.
All the below commands will require root access. You can either run them with sudo  or switch to root user as mentioned below.
sudo su -
Install LVM
[root@cloudvedas ~]# yum install lvm2*
Check LVM version
[root@cloudvedas ~]# lvm version
Label the new disk and bring it under LVM using pvcreate
Create PV (Physical Volume)
[root@cloudvedas ~]# pvcreate /dev/sdb1
Show PV
[root@cloudvedas ~]# pvs /dev/sdb1
Create VG (Volume Group)
[root@cloudvedas ~]# vgcreate cvsvg /dev/sdb1
Show VG
[root@cloudvedas ~]# vgs cvsvg
Display VG
[root@cloudvedas ~]# vgdisplay cvsvg
Extend VG
[root@cloudvedas ~]# vgextend cvsvg /dev/sdb2
Create LV (Logical Volume)
[root@cloudvedas ~]# lvcreate -L 500M cvsvg -n cldvdsvol1
Display LV 
[root@cloudvedas ~]# lvdisplay /dev/cvsvg/cldvdsvol1
Create mirror volume
 lvcreate -L 100M -m1 -n cvmirrorvol1 cvsvg
Create striped volume
[root@cloudvedas ~]# lvcreate -L 50M -i 3 -I 64 -n stripevol cvsvg
Here
-i|--stripes (Number of disks in stripe)
-I|Stripe size
Extend LV
lvextend -L +20M /dev/cvsvg/stripevol
De-activate volume
lvchange -an /dev/cvsvg/stripevol
Activate volume
lvchange -ay /dev/cvsvg/stripevol
Remove LV
Ensure filesystem is unmounted before running this
lvremove /dev/cvsvg/stripevol
Create filesystem
mkfs -t ext4 /dev/cvsvg/cldvdsvol1
Create directory
mkdir /CVFS1
Mount filesystem
mount /dev/cvsvg/cldvdsvol1  /CVFS1
All the available LVM commands
[root@cloudvedas ~]# lvm help
 Available lvm commands:
 Use 'lvm help <command>' for more information

devtypes Display recognised built-in block device types
 dumpconfig Dump configuration
 formats List available metadata formats
 help Display help for commands
 lvchange Change the attributes of logical volume(s)
 lvconvert Change logical volume layout
 lvcreate Create a logical volume
 lvdisplay Display information about a logical volume
 lvextend Add space to a logical volume
 lvmchange With the device mapper, this is obsolete and does nothing.
 lvmdiskscan List devices that may be used as physical volumes
 lvmsadc Collect activity data
 lvmsar Create activity report
 lvreduce Reduce the size of a logical volume
 lvremove Remove logical volume(s) from the system
 lvrename Rename a logical volume
 lvresize Resize a logical volume
 lvs Display information about logical volumes
 lvscan List all logical volumes in all volume groups
 pvchange Change attributes of physical volume(s)
 pvresize Resize physical volume(s)
 pvck Check the consistency of physical volume(s)
 pvcreate Initialize physical volume(s) for use by LVM
 pvdata Display the on-disk metadata for physical volume(s)
 pvdisplay Display various attributes of physical volume(s)
 pvmove Move extents from one physical volume to another
 pvremove Remove LVM label(s) from physical volume(s)
 pvs Display information about physical volumes
 pvscan List all physical volumes
 segtypes List available segment types
 tags List tags defined on this host
 vgcfgbackup Backup volume group configuration(s)
 vgcfgrestore Restore volume group configuration
 vgchange Change volume group attributes
 vgck Check the consistency of volume group(s)
 vgconvert Change volume group metadata format
 vgcreate Create a volume group
 vgdisplay Display volume group information
 vgexport Unregister volume group(s) from the system
 vgextend Add physical volumes to a volume group
 vgimport Register exported volume group with system
 vgmerge Merge volume groups
 vgmknodes Create the special files for volume group devices in /dev
 vgreduce Remove physical volume(s) from a volume group
 vgremove Remove volume group(s)
 vgrename Rename a volume group
 vgs Display information about volume groups
 vgscan Search for all volume groups
 vgsplit Move physical volumes into a new or existing volume group
 version Display software and driver version information
[root@cloudvedas ~]#

Solved : Comparing Run Levels in Linux and Solaris and precautions withthem

Many people get confused between run levels in Linux and Solaris. One major difference among these can be disastrous also.  In this post we will show you the different Run levels in both these OS and what precautions you should take while working on these.
Let’s first take a look at Run levels.
Linux Run Levels
IDNameDescription
0HaltNo activity, System can be safely shut down.
1Single-user modeFor administrative tasks only. Rarely used.
2Multi-user modeMultiple users but no NFS (Network File System).
3Multi-user mode with networkingMultiple user but command line mode only.
4Not used/user-definableFor special purposes. User definable.
5Start the system normally with appropriate display manager (with GUI)It’s similar to run level 3 but with GUI display.
6RebootReboots the system.
Solaris Run levels
IDNameDescription
0Power-down statePower down state(OBP level after POST). Will bring server to OK prompt for maintenance.
s or SSingle-user stateTo run as a single user with all file systems mounted and accessible. Only root user is allowed login.
1Single User – Administrative stateTo access all available file systems with user logins allowed.
2Multi-user modeMultiple users but no NFS(Network File System). i.e. all daemons running except NFS daemon.
3Multi-user mode with networkingAll daemons running including NFS with GUI.
4Not used/user-definableFor special purposes. User definable.
5Power-offShutdown gracefully. Difference from Level 0 is that you won’t get any OBP (OK) prompt in Level 5
6RebootReboots the system.
Precaution
Not sure if you have noticed but there is major difference in Run Level 5 of both the OS. For Linux, run level 5 means multi user with GUI, all good. But for Solaris, run level 5 means power-off, ouch! . Many Linux admins who start working on Solaris makes the mistake of executing “init 5” on Solaris to get the GUI but, that actually brings down a Solaris server. Hope you never make this mistake on production box.
Check current run level
who -r
Above command will tell  you the current level of your system.

Solved: How to mount ISO in a linux VM

In this post we will discuss how to mount ISO in Linux VM running inside Virtualbox or VMware.
Virtualbox
You can mount ISO in Linux VM running on Virtualbox by following these steps
  • Select the running machine window.
  • Click on Devices > Optical Devices
  • Choose disk image, browse and select ISO .
  • Now go to the redhat linux server and execute the mount command
 mount /dev/cdrom /mnt
VMware
  • If the linux VM is in VMware. You can select the iso image in vmware console similar to what we did for virtual box.
  • Right click on the machine > “Removable Devices” > “CD/DVD” > Settings. Browse and select the ISO. Check mark on “Connected”.
  • Finally execute the following command in Linux VM.
    mount /dev/sr0 /mnt
  • If you do “df -h” new ISO should be mounted and visible to you as /mnt .
Tip: If you are getting error /mnt busy ensure that /mnt is not already mounted. If /mnt is already mounted either unmount /mnt first and try again or create a new directory and mount the ISO on the new directory.

In what sequence startup and shutdown RC scripts are executed in Solaris

We can use RC (Run Control) scripts present in /etc/rc* directories to start or stop a service during bootup and shutdown.
Each rc directory is associated with a run level. For example the scripts in rc3.d will be executed when the system is going in Run Level 3.
All the scripts in these directories must follow a special pattern so that they can be considered for execution.
The startup script file starts with a “S” and kill script start with a “K”. The uppercase is very important or the file will be ignored.
The sequence of these startup and shutdown script is crucial if the applications are dependent on each other.
For example while booting up a database should start before application. While during shutdown the application should shutdown first followed by Database.
Here we will see how we can sequence these scripts.
So as given in below example during startup S90datetest.sh script was executed first and than S91datetest.sh .
Time during execution of CloudVedas script S90datetest.sh is Monday, 23 September 2016 16:19:43 IST
Time during execution of CloudVedas script S91datetest.sh is Monday, 23 September 2016 16:19:48 IST
Similarly during shutdown K90datetest.sh script was executed first and then K91datetest.sh .
Time during execution of CloudVedas script K90datetest.sh is Monday, 23 September 2016 16:11:43 IST
Time during execution of CloudVedas script K91datetest.sh is Monday, 23 September 2016 16:11:48 IST
This sequencing is also a trick interview question and it confuses many people.

Solved: How to create a soft link in Linux or Solaris

In this post we will see how to create a softlink.
Execute the below command to create a softlink.
[root@cloudvedas ~]# ln -s /usr/interface/HB0 CLV
So now when you list using  “ls -l”  the softlink thus created will look like.
[root@cloudvedas ~]# ls -llrwxrwxrwx. 1 root root 18 Aug 8 23:16 CLV -> /usr/interface/HB0[root@cloudvedas ~]#
Try going inside the link and list the contents.
[root@cloudvedas ~]# cd CLV[root@cloudvedas CLV]# lscloud1 cloud2 cloud3[root@cloudvedas CLV]#
You can see the contents of /usr/interface/HB0 directory.

What are the maximum number of usable partitions in a disk in Linux

Linux can generally have two types of Disks. IDE and SCSI.
IDE
By convention, IDE drives will be given device names /dev/hda to /dev/hdd. Hard Drive A (/dev/hda) is the first drive and Hard Drive C (/dev/hdc) is the third.
A typical PC has two IDE controllers, each of which can have two drives connected to it. For example, /dev/hda is the first drive (master) on the first IDE controller and /dev/hdd is the second (slave) drive on the second controller (the fourth IDE drive in the computer).
Maximum usable partitions 63 for IDE disks.
SCSI
SCSI drives follow a similar pattern; They are represented by ‘sd’ instead of ‘hd’. The first partition of the second SCSI drive would therefore be /dev/sdb1.
Maximum usable partitions 15 for SCSI disks.
A partition is labeled to host a certain kind of file system (not to be confused with a volume label). Such a file system could be the linux standard ext2 file system or linux swap space, or even foreign file systems like (Microsoft) NTFS or (Sun) UFS. There is a numerical code associated with each partition type. For example, the code for ext2 is 0x83 and linux swap is 0x82.
To see a list of partition types and their codes, execute /sbin/sfdisk -T

Solved: How to scan new LUNs in Redhat Linux

In this post  we will discuss how to scan new LUNs allocated by storage team to a Redhat Linux system.
There are two ways of scanning the LUNs
Method 1:-
Find how many SCSI bus controllers you have

  • Go to directory /sys/class/scsi_host/  and list it’s contents.

cd /sys/class/scsi_host/ 
[root@scsi_host]# ls
host0 host1 host2
[root@scsi_host]#
  • Here we can see we have three SCSI bus controllers. So in below command replace hostX with these directory names.
Run the Command ,
echo "- - -" > /sys/class/scsi_host/hostX/scan 
[root@cloudvedas]# echo "- - -" > /sys/class/scsi_host/host0/scan
[root@cloudvedas]# echo "- - -" > /sys/class/scsi_host/host1/scan
[root@cloudvedas]# echo "- - -" > /sys/class/scsi_host/host2/scan
[root@cloudvedas]# echo "- - -" > /sys/class/scsi_host/host3/scan
TIP:- Here the “- – -” denotes CxTxDx i.e. Channel(controller) , Target ID and Disk or LUN number. This is asked in Linux Admin Interviews also.
  • Repeat the above step for all three directories.
If you have FC HBA in the system you can follow the steps as below:-
  • First check number of FC controllers in your system
#ls /sys/class/fc_hosthost0 host1 host2
  • To scan FC LUNs execute commands as
echo "1" > /sys/class/fc_host/host0/issue_lip
echo "1" > /sys/class/fc_host/host1/issue_lip
echo "1" > /sys/class/fc_host/host2/issue_lip

Tip :- Here echo “1” operation performs a Loop Initialization Protocol (LIP) and then scans the interconnect and causes the SCSI layer to be updated to reflect the devices currently on the bus. A LIP is, essentially, a bus reset,  and will cause device addition and removal. This procedure is necessary to configure a new SCSI target on a Fibre Channel interconnect. Bear in mind that issue_lip is an asynchronous operation.
  • Verify if the new disk is visible now
fdisk -l |egrep '^Disk' |egrep -v 'dm-'
Method 2 :-
  • Next method is to scan using SG3 utility. You can install it using
yum install sg3_utils
  • Once installed  run the command
/usr/bin/rescan-scsi-bus.sh

Solved: How to add swap space in Redhat or Ubuntu Linux

In this post  we will see how we can add a file as swap space in Linux. Same steps are to be followed for Redhat and Ubuntu Linux.
Type the following command to create 100MB swap file (1024 * 100MB = 102400 block size):
dd if=/dev/zero of=/swap1 bs=1024 count=102400
Secure swap file
Setup correct file permission for security reasons, enter:
# sudo chown root:root /swap1# sudo chmod 0600 /swap1
Set up a Linux swap area
Type the following command to set up a Linux swap area in a file:
# sudo mkswap /swap1
Activate /swap1 swap space :
# sudo swapon /swap1
Update /etc/fstab file to make it persistent across reboot.
vi /etc/fstab
Add the following line in file:
/swap1 swap swap defaults 0 0
To check if the swap file is added or not
Type the following swapon command:
#sudo swapon -sFilename Type Size Used Priority/dev/dm-0 partition 839676 0 -1/swap1 file 102396 0 -2
It should show you the new file.
If you want add a logical volume for swap please refer how to add LV for swap .

How to add logical volume for swap in Redhat Linux

In our last post we have seen how to add a file for swap space.
In this post we will see how to add a LVM2 Logical Volume as swap.
Here we have a VG name VG1 in which we will create a volume LV1 of 1GB.
# lvcreate VG1 -n LV1 -L 1G
Format the new swap space using mkswap:
# mkswap /dev/VG1/LV1
Update /etc/fstab file with below entry:
# /dev/VG1/LV1 swap swap defaults 0 0
Enable the extended logical volume:
# swapon -v /dev/VG1/LV1

Solved: How to change the keyboard layout for Redhat Linux

Nowadays we work as global teams and with people speaking different languages.
Some times you may face a situation where the Linux OS is installed with preference to another language e.g. French.  The layout of french keyboard is different from that of US keyboard. Thus if you type  “A” in US keyboard it will actually print “Q” . (Here you can get images of french keyboard)
This can be very frustrating since you are already accustomed with the US keyboard layout.
To  get you out of this situation the easiest way is that once you login to the linux box. Run below command.
loadkeys us
This simple command will map the session with US keyboard layout. So now when you type “A” in your US layout keyboard it will be printed as “A” only. And this won’t change any langs in OS as it is mapped only to your session.
Do note that before you login you will still have to type userid and password in french layout only.  Command can obviously be executed only after you login. So the image link i shared above should be helpful in getting you through the login stage.
Hope this post helps you.

Solved: How to change hostname in AWS EC2 instance of RHEL 7

In our last post we have seen how to change hostname of an RHEL server.
But if you are using the RHEL 7 AMI provided on AWS marketplace the steps will be slightly different.
First login to your EC2 instance. (Check this post to know How to login to AWS EC2 Linux instance.)
Once you login to your EC2 instance execute below command.
 sudo hostnamectl set-hostname --static cloudvedas
(Here “cloudvedas” is the new hostname.)
If you want to make it persistent across reboot follow further.
Now using vi or vim editor edit the file /etc/cloud/cloud.cfg
sudo vi /etc/cloud/cloud.cfg
At the end of file add the following line and save the file
preserve_hostname: true
Finally reboot the server
sudo reboot
Once the server is up, check the hostname.
ec2-user# hostname
cloudvedas
ec2-user#
It should now show you the new hostname.